Approaches for securing your Avaya Aura environment.
Every week I speak to one or two customers that ask the same questions – what do I need to do to deploy certificates in my environment and what is the best way to do that? Customers need to deploy certificates into their UC infrastructure to effectively secure communications. Avaya provides a certificate authority (CA) as part of System Manager. System Manager makes it easy for UC administrators to deploy certificates for Avaya products, but this is just one option and may not be ideal for all customers. Let’s look at several different deployment options, pros and cons, and conclude with the approach I suggest to customers.
But First – Remember what a CA does A certificate authority issues certificates to allow systems to validate the identify of the server they are connecting to – that simple! It is not to say that the process can become complex, but one system will trust another system based on the certificate it presents. The certificate is always signed. The notion here is that if you trust the signer of the certificate, then you can trust the certificate. For example, a passport is a certificate. Any border agent will trust the certificate not because it has your name and picture on it, but rather that it is signed by the government. Also – just like computer certificates, there is digital encryption to back up the signature to insure it is not counterfeit.
Using System Manager as your CA Avaya provides a CA as part of System Manager. This allows UC administrators to be nimble in assigning and renewing certificates for their environment without the need to go to others in their organization or to an external certificate authority.
Pros
Works out of box.
Automatically issues and deploys certificates for managed systems such as Session Manage and Breeze!
Aura environment stands alone and does not require any other system.
No additional costs and the certificates are free.
Cons
Public Key Infrastructure (PKI) PKI is independent of other PKI.
No enterprise branding.
Must distribute System Manager root certificate to endpoints and systems.
Your I/T or Security department may not trust System Manager, or your Telcom administrators with the task of generating certificates. They also may not allow the use of a CA not under their control.
Pros
Provide enterprise asserted trust.
Certificates may already be distributed to client devices. For example – computer on a Windows domain will trust certificates generate by the domain CA
Relatively straight forward deployment.
Cons
Must manually establish PKI trust chain to Aura managed devices.
Must create Certificate signing request and import identity certificates.
No automatic issue or re-issue of certificates for managed devices.
Usually need to work with an external group to issue certificates which can cause delay or errors in certificate creation.
Using a private or public certificate authority. Your company may run a certificate authority, or may mandate that you use a public certificate authority – like Verisign or GoDaddy.
Thanks for checking out my presentations at IAUG. Click the links below to download the Powerpoint Presentations or PDF files. The Powerpoint slides have builds and animations that won’t show in the PDFs…
Thanks for attending IAUG in Orlando! I had a lot of fun doing these presentations for John Waber and David Lover. Here are the 3 presentations. Please reach out to me with comments or questions. I hope you enjoyed them!
Many customers I have worked with over the past two weeks were getting call center staff up with Avaya’s One-X Agent and Agent for Desktop due to the need to have people working at home. I got many requests for a quick install guide for One-X Communicator. Communicator can be installed quickly and supports h.323 and SIP protocols.
For users that have a SIP infrastructure, Communicator can be used via an SBC remote worker configuration to give access to users from anywhere. If you don’t have an Avaya SBC, you can always connect your PC via VPN and use SIP or h.323 protocol. I will focus on h.323 first, and then add on some additional configuration you need for SIP.
Configuring for h.323 Protocol
First off, download the latest release of software here.
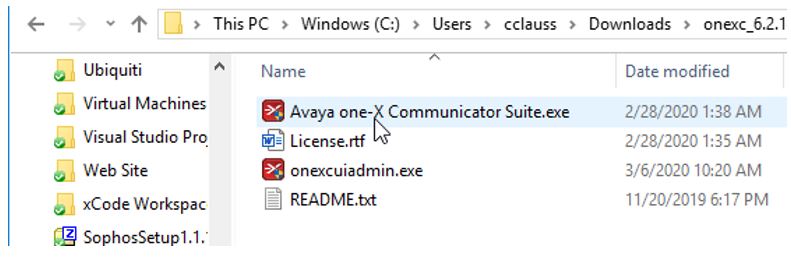
Unzip the file and run the “Avaya one-x Communicator Suite.exe”. You may need administrative access to install this on your computer.
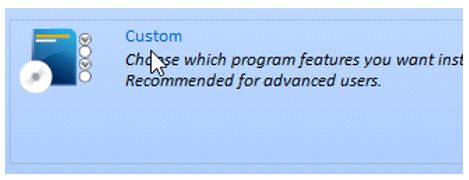
Select the language you wish to use and accept the EULA. The select Custom install.
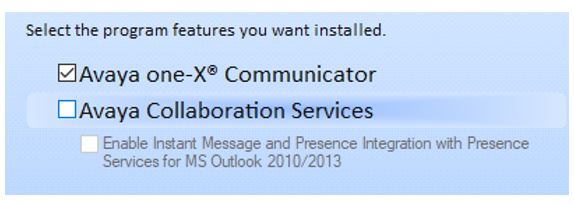
Uncheck Avaya Collaboration Services. Most users will not use this service and you may have some issues with Office applications if you leave it on.
After that, click next through the install program and click finish. Go ahead and start the program.
Setting up for h.323 protocol…
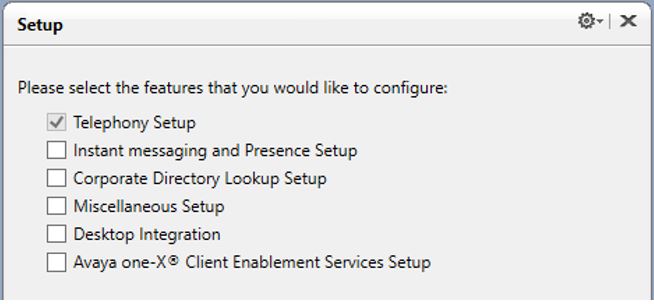
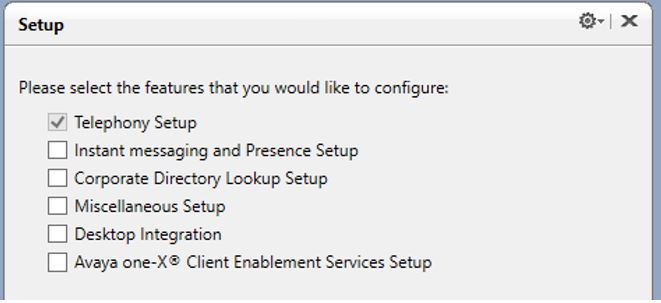
The first time you run the software you will be asked several questions. For a simple deployment, just leave “Telephony Setup” checked and click next.
Select H.323 protocol and click next.
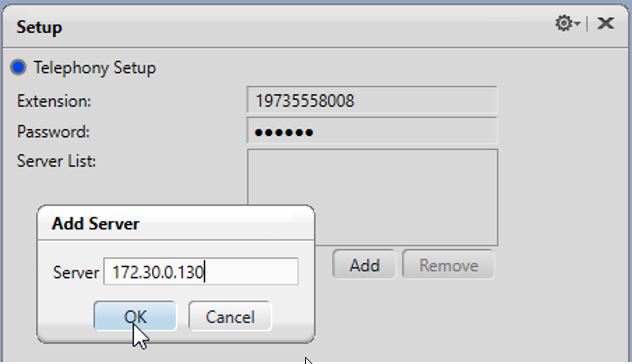
Enter your extension number, extension password, and click “Add” to enter the IP address of your Communication Manager.
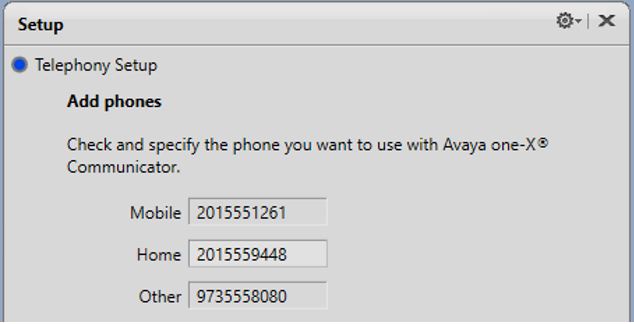
Click next and you be asked to add phones. These numbers are used if you wish to enable telecommuter mode. More on that later. You can skip this step if you are using VPN or SBC.
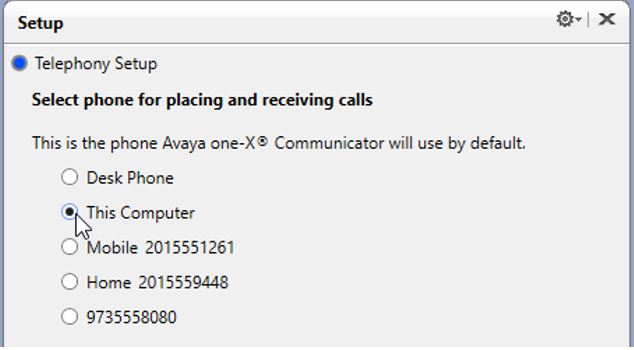
Next, you will be asked where you generally wish to make and receive calls. You normally will select “This Computer”.
Desk Phone – Communicator will control the Avaya phone on your desk. This Computer – You will use your PC with a headset to make and receive calls. Other numbers – you entered in the previous step. This is for telecommuter mode.
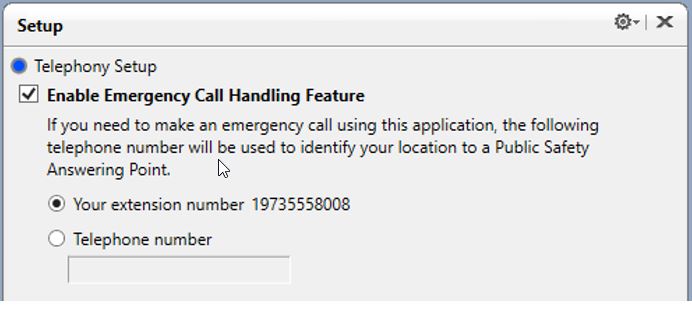
Last, enter information about emergency number handling – this allows your location to be identified if you call emergency services from Communicator. For a home worker, they may wish to specify your home or cell number here. Then click Finish.
Communicator will shut down. Go ahead and start it up again.
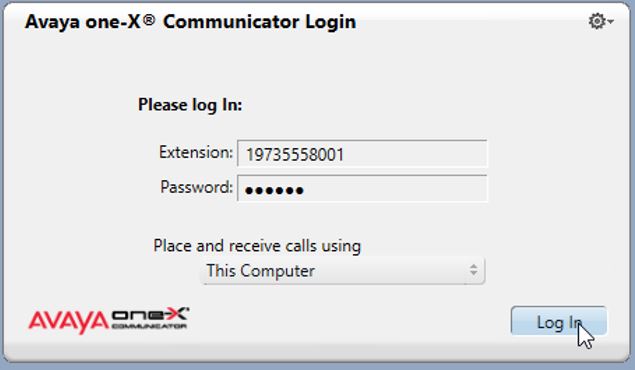
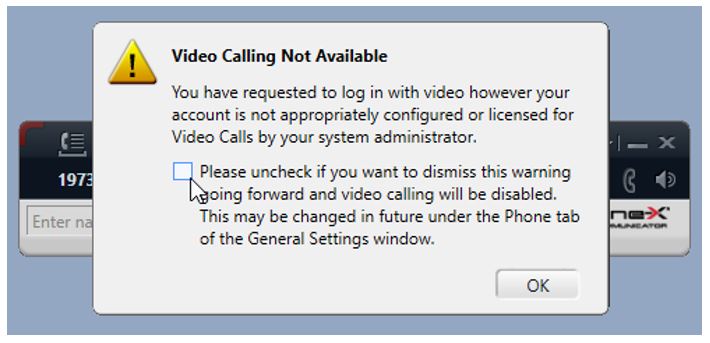
You will now be presented with a login screen. Your extension and password should be there. It will also show where you will make and receive calls. Click “Log In”. You may get a message about video calling – just uncheck the box so you don’t get the warning again.
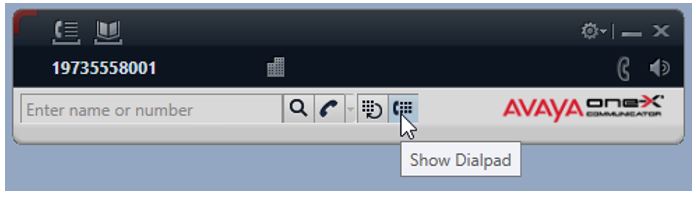
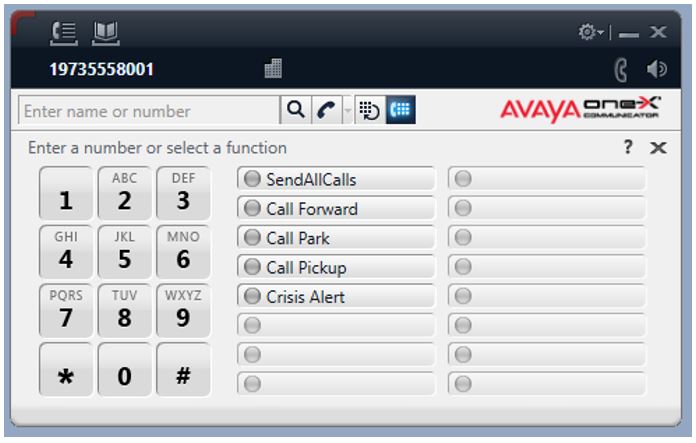
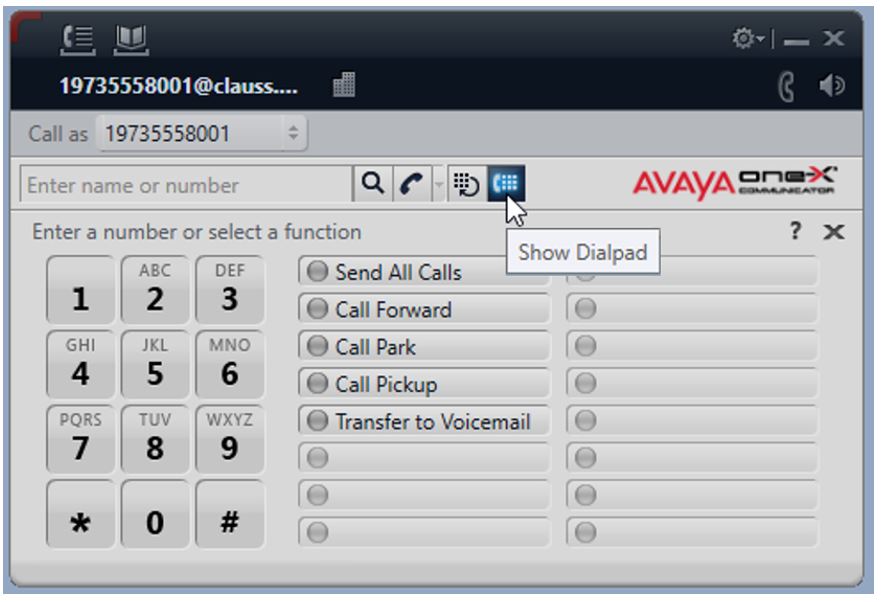
You are now logged in and can make and receive calls. To see your feature buttons, click on the dial pad.
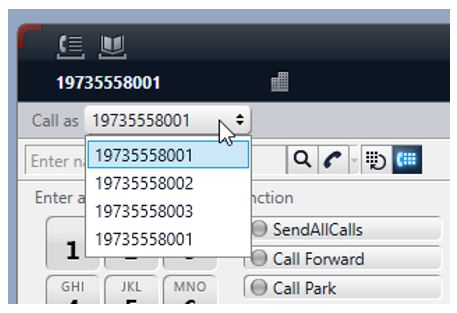
Now you get to play with the software. Note that the buttons may not be in the same order as your Avaya phone at the office. Also, bridge appearances will not show as buttons. Instead, they bridge will show who is being called when a call comes in. There will also be a “Call as” selection to specify if you are calling from your extension or one of the bridged appearances.
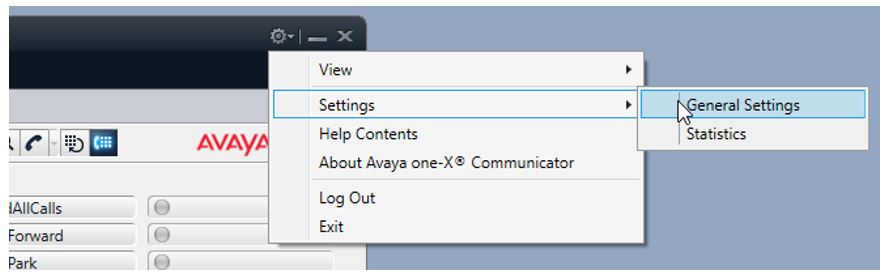
To configure other settings, such as dialing rules, audio & video device settings, directory integration, click on the gear icon and select Settings / General Settings.
When you wish to end your workday, click the gear icon and select Log Out.
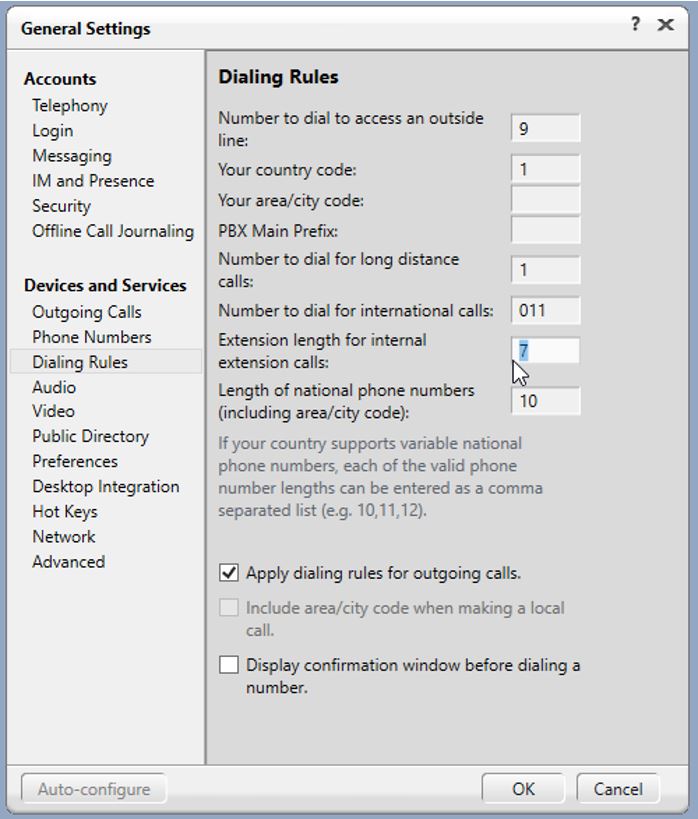
Note that by default the software will add a “9” before any number. Dialing rules can be turned off if you wish. Be sure to check that the extension length is correct.
Configuring for SIP protocol…
The first time you run the software you will be asked several questions. For a simple deployment, just leave “Telephony Setup” checked and click next.
Select SIP protocol and click next.
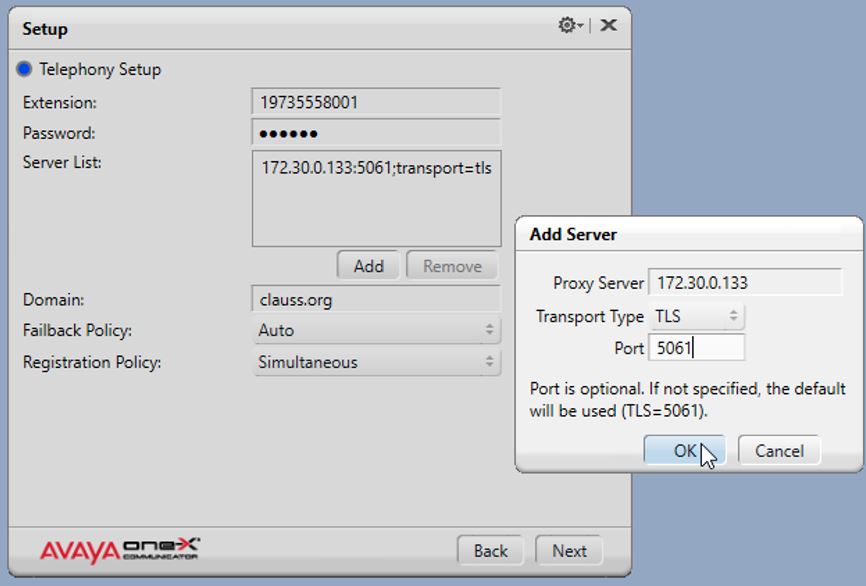
Enter your extension number, extension password, and SIP domain, then click “Add” to enter the IP address of your Session Manager SM100. Don’t enter the management address of the Session Manager. For the transport type select TLS and 5061 for the port.
Note that feature buttons generally will only work if using TLS protocol. If using TCP, it is likely you will be able to register the phone and make and receive calls, but you won’t see buttons. If you want to know more about why this is the case, drop me an email.
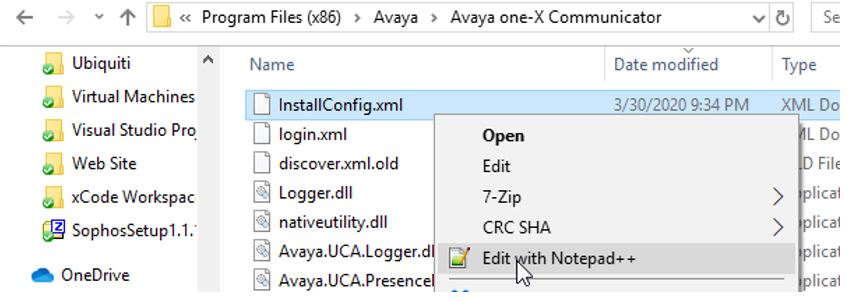
Continue with the rest of the prompts as shown in the h.232 section above. Before we can run Communicator and login, you probably must do two things. Install the certificate for Session Manager and change a setting in the installconfig.xml file.
Installing the certificate for Session Manager…
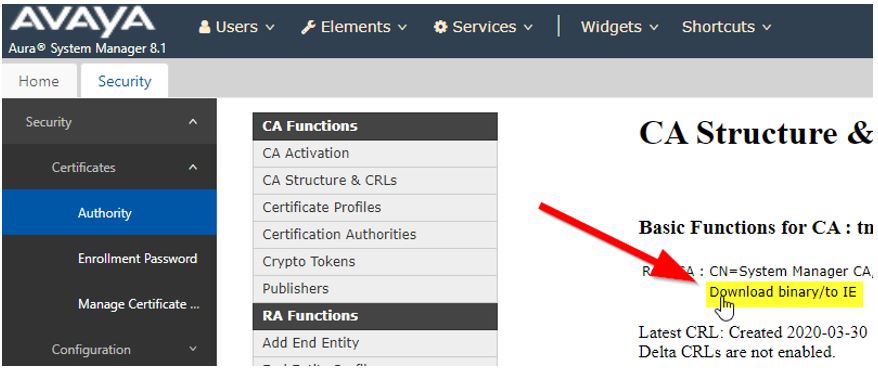
Have your system administrator provide the root certificate that authenticates your Session Manager server. This is usually your System Manger root certificate, but it may be another certificate authority. If using System Manager, your administrator can get the certificate from Services / Certificates / Authority / CA Structure & CRLs / Download binary/to IE
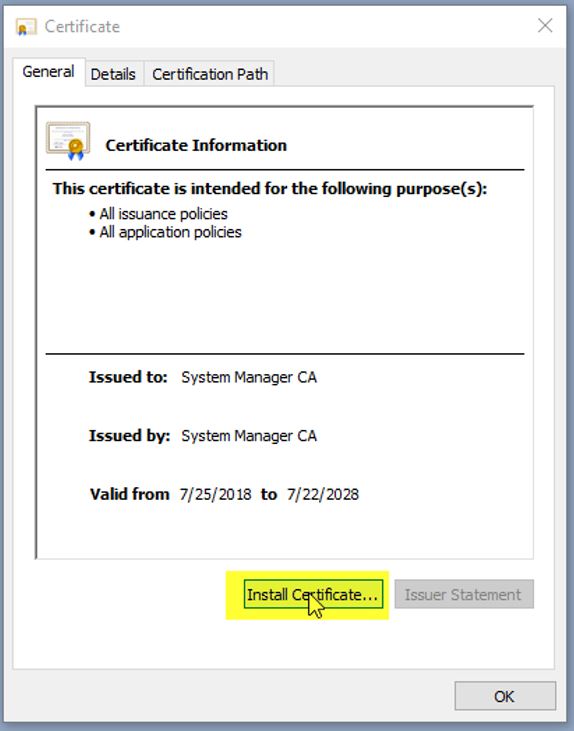
Once you download the file and copy to your computer, open the file and click “Install Certificate…”
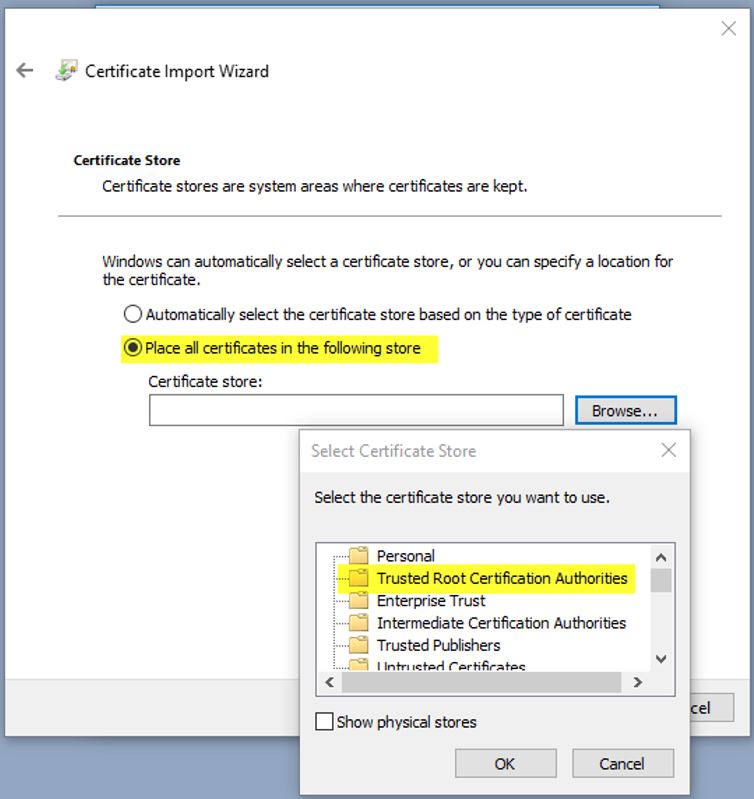
Select Local Machine, then click Next. Select the option to Place all certificates in the following store and select Trusted Root Certification Authorities. Click OK and finish the certificate install.
Lastly, edit the following file with a text editor. Make sure Communicator is closed first.
Now go ahead and start Communicator and login with your extension and password. Press the “Show Dialpad” button and make sure that your softphone shows feature buttons. If not, there is a problem with Personal Profile Manager (PPM) and certificates between the CM and Session Manager. You will probably need help fixing that from Avaya or ConvergeOne.
Some things to check if things are not working…
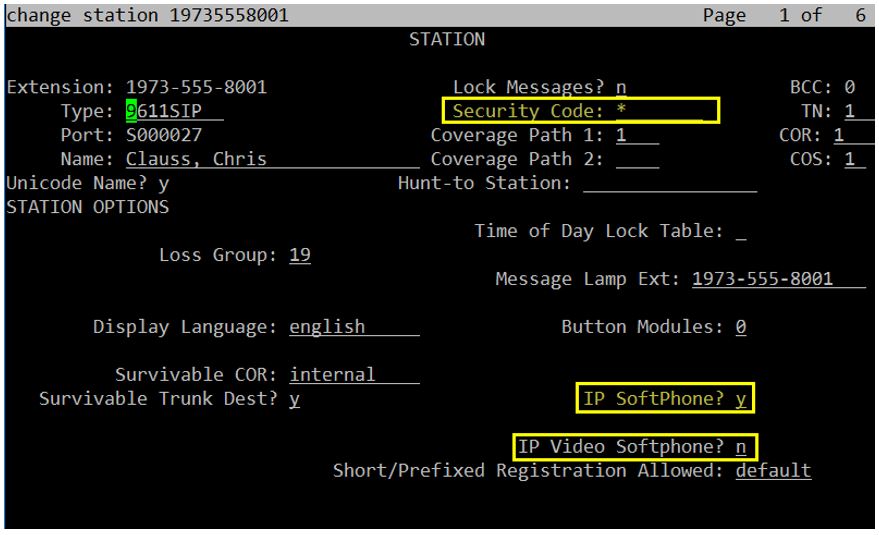
IP Softphone must be enabled on page 1 of the CM station form.
For h.323 stations, the security code needs to be set on the same form.
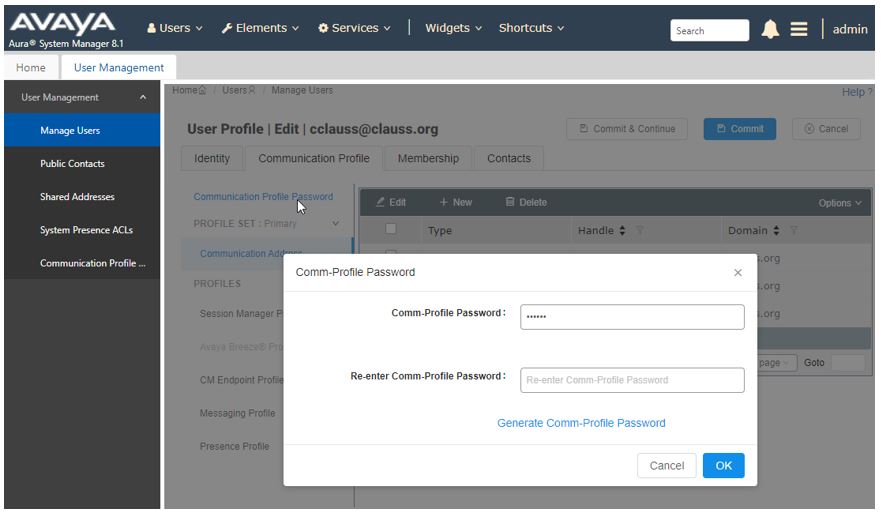
For SIP stations, the station password is set on the user profile in System Manager. The station password on CM is not used.
Auto Configuration of Communicator
Communicator also has the ability to read a 46xxsettings.txt file so you don’t have to manually configure the settings. Unfortunately, you must add a file to the installation for this to work. Communicator looks for a file called “discover.xml” to allow it to auto configure settings.
Place the file in the installation folder – C:\Program Files (x86)\Avaya\Avaya one-X Communicator
Here is a copy of the discover.xml that I am using…
Autorun – true / false – if auto configure happens every time you start
Server – the IP address or host name of your Utility Server of Web Server that hosts your 46xxsettings.txt file
Server Directory – the folder that contains the file – usually blank for root folder
Server File – the name of your configuration file. In the example above I named my file communicator.txt, but you can also use your 46xxsettings.txt
Group – This specifies which group settings you wish to use in your settings file for the Communicator.
Here is a copy of the “communicator.txt” file I am using. My file is very simple – just configuring the server address. You can add other items such as dialing rules.
SET MCIPADD 172.30.0.130 SET GMTOFFSET -5:00 SET NO_DIGITS_TIMEOUT 60 SET TRUSTCERTS SystemManagerCA.cacert.txt SET TLSSRVRID 0
Now when you start communicator, you will see it trying to discover settings
Communicator will find settings and ask you for what it still needs.
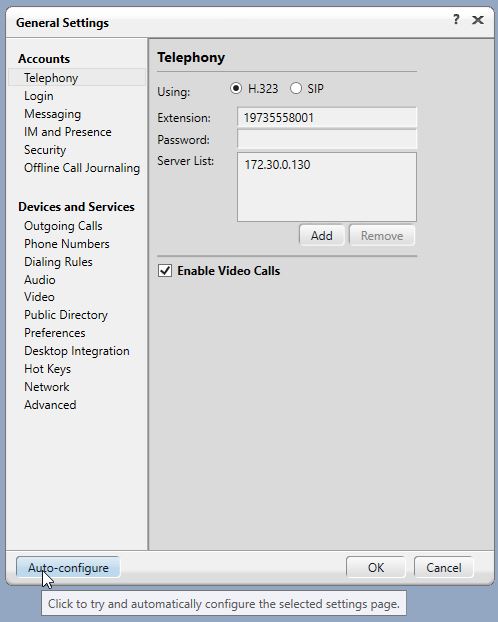
You can also refresh settings manually by clicking the Auto-Configure button in the settings screen.
For more information on auto configuration, check out the Avaya one-X Communicator Centralized Administration Tool Guide. You can configure additional settings such as:
Login Settings
Dialing Rules
General Settings
Feature Settings
Button Names
Good luck on your installs. I hope this helps. Let me know what information needs to be added and drop me questions here or via email.
Customers are scrambling to get Avaya Agent software deployed for remote workers to deal with the COVID19 work from home scenarios. Good news is that Avaya is providing temporary licensing. If your Agents can work from home using a VPN, they can set up remote worker quickly. If is important to note that the VPN can’t be doing NAT translations, and it must route to your voice VLAN for this to work!
To do this, install a copy, configure it, and then copy the configuration to other users. Here are some cheats I use to get this running fast!
First off – download the LATEST version of One-X Agent that is current and addresses bug fixes. It is available here.
Next – we want to set up one agent that is working perfectly that can be used to build a config that can be copied to others.
Unzip the download from Avaya and run OneXAgentSetup.exe. You will basically click “next” through the install. Don’t enable “Central storage of profile information” – that is only for companies using Avaya Control Manager. Select the languages you need. On the option screen, leave stuff unchecked unless you need click to dial from browsers. All other options should be default. Note that some users may not be able to install the software themselves if they don’t have admin access to their PC.
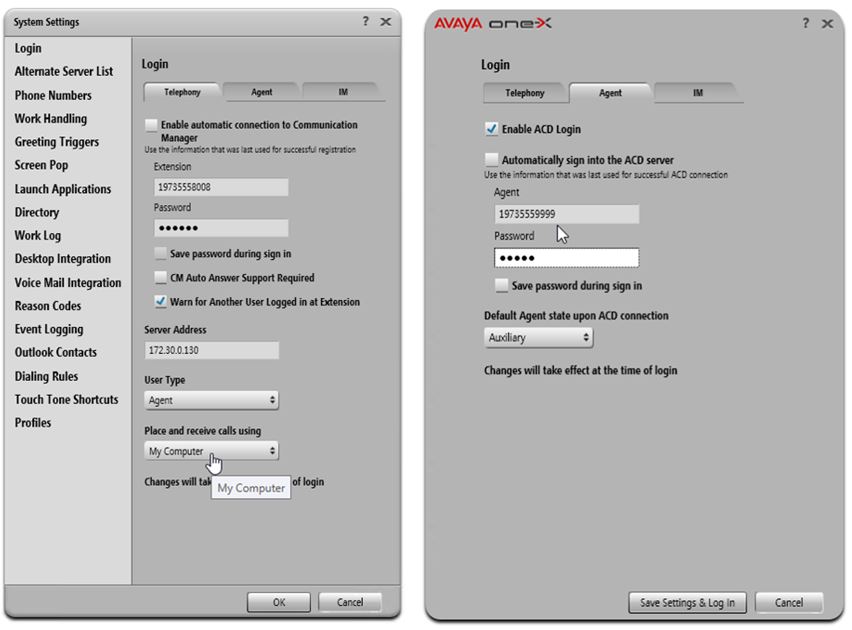
Start the Agent and click the “Change Login Settings” button. Enter the station, station password, and CM processor address on the Telephony tab. Set “Place and Receive calls using” to “My Computer”. Enter the Agent ID and password on the Agent tab. Click save settings and login.
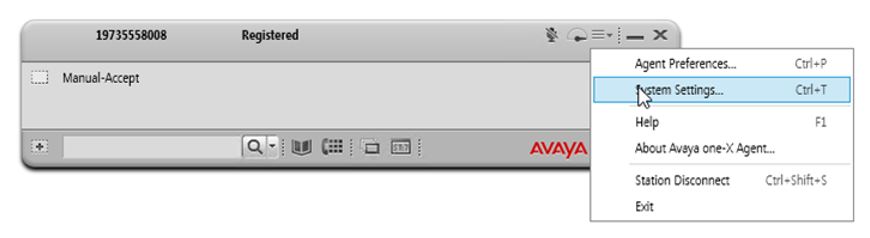
At this point the Agent will try to login to the extension. If successful it will show “Registered”
Next, click on the 3 bars on the top left and select System Settings…
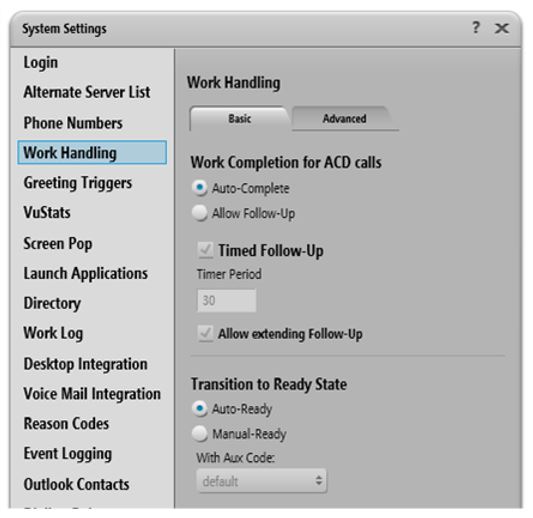
Make sure the Work Handling section meets the needs of your environment. You usually don’t need to change defaults.
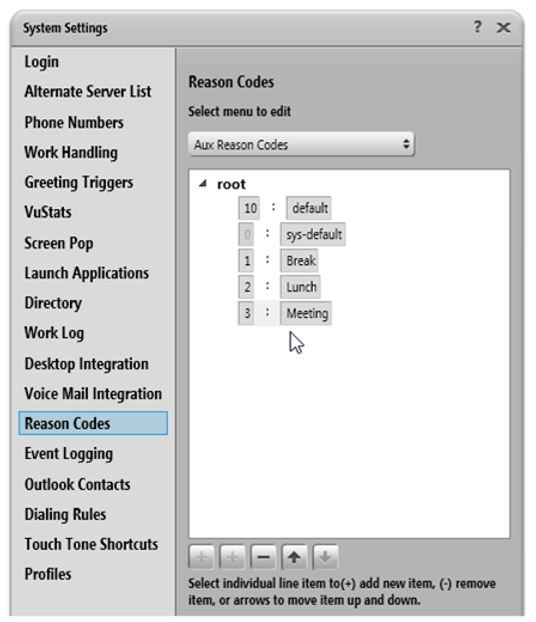
Also add Reason Codes to match what is listed in the PBX for Aux Work, Work, and Logout. You can find the list on the Communication Manager by entering “display reason-code-names”
At this point, you should be able to login the station and the agent. If the agent is not logging in, you are probably missing Agent buttons on the set. Check out this doc for more information – https://downloads.avaya.com/css/P8/documents/100069879
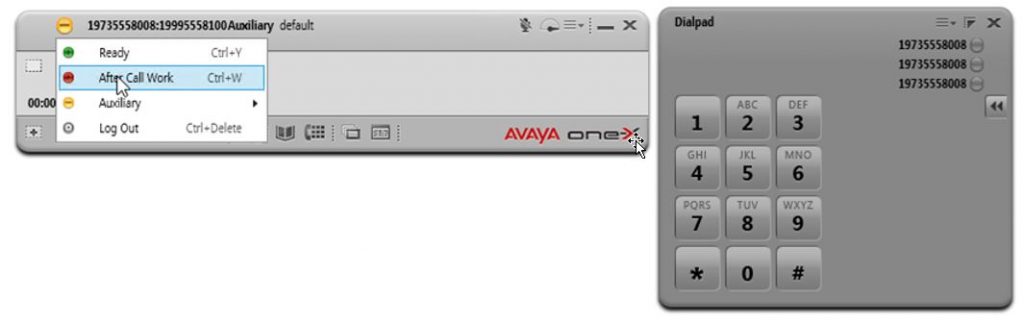
Test the agent. Tune any of the other config settings to make sure the agent can login and take calls. Make sure that you can switch between work modes. If not, you should check the reason codes in the config.
Now that you have one Agent working perfectly, you can do the same thing for everyone else, but we instead, let’s zip up the configuration files.
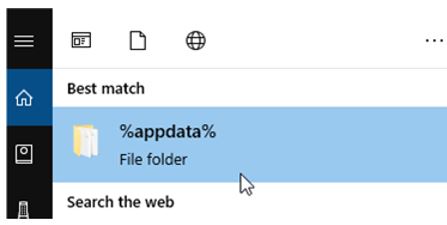
EXIT THE AGENT SOFTWARE the click start on your PC and type in %appdata%
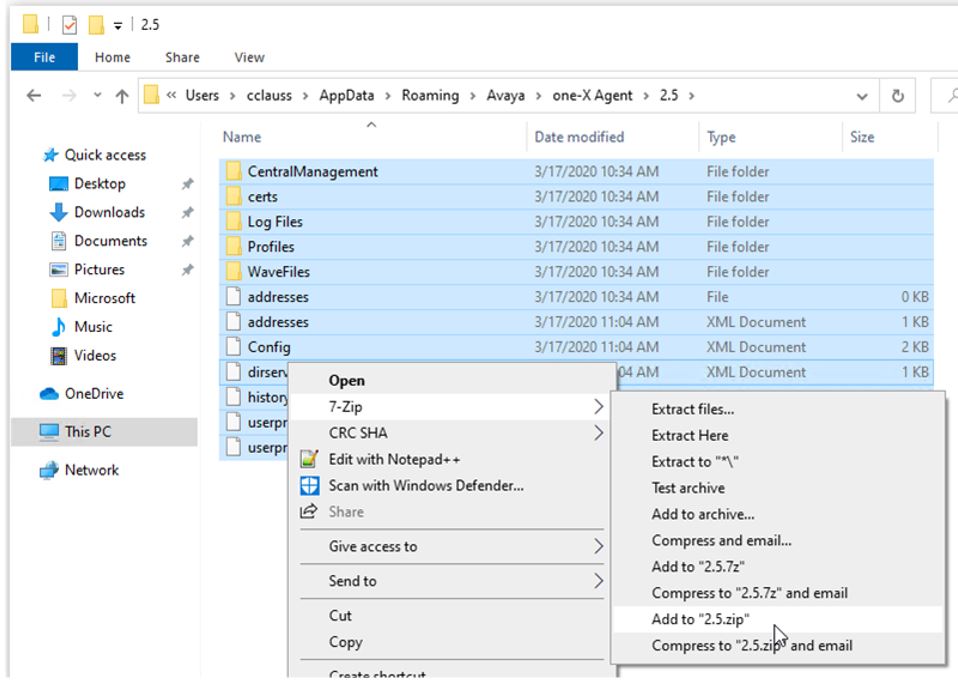
Then browse to the Avaya \ One-X Agent \ 2.5 folder. ZIP up the contents of this folder. This will contain all the configurations you just did.
Now install the Agent on other computers. You can follow the same install instructions as you did before, or you can use a silent install to push the software onto other machines. Run the following command to do a silent install with default options.
OneXAgentSetup.exe /qn
Last but not least, start Agent on the new computer so it creates the profile folder, then click “Cancel” without doing anything. This builds %appdata% the profile folder.
Unzip the file you created to the “ %Appdata% / Avaya / one-X Agent / 2.5 “ folder. Then start the Agent again and change the station and agent login information. You should be done! Savvy administrators could script this process to do the silent install and copy files to the computer in background.
If your week has been anything like mine, COVID19 and remote worker has been what everyone is talking about. I have been on dozens of conference calls with customers thinking about how to send their workers home and provide a solid UC solution. Fortunately, Avaya has always provided great solutions in this area and is providing temporary licensing to those in need. With that said, there is still confusion about what you need, particularly when using VDI solutions.
VDI is fantastic as many customers can simply provide a web gateway to allow access to applications. In many cases, workers can use their personal computers to securely start a virtual desktop. The problem comes in when users think they can start a softphone in the VDI session. That won’t work! Sound will not play in real time for phone calls.
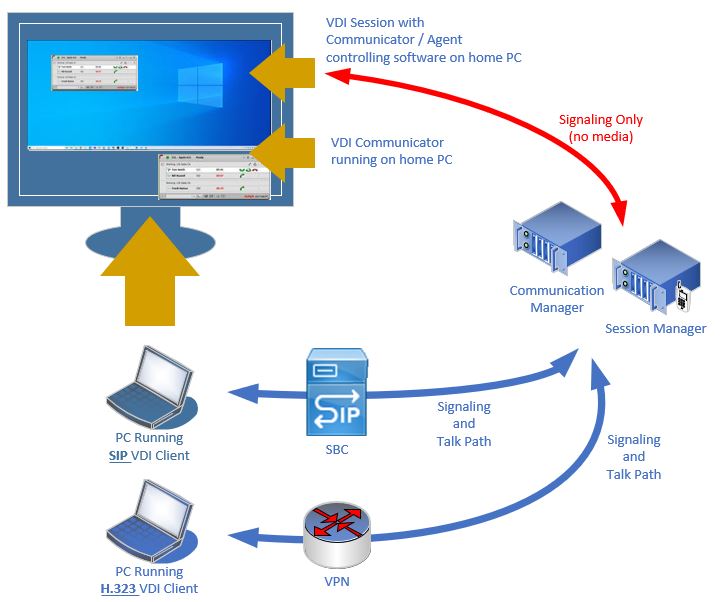
To bring voice to the remote worker, Avaya provides “VDI Communicator” software that runs on the end user computer. The user starts this software and connects to the PBX before starting the VDI session. In the VDI session, the user then starts their softphone client in “control the phone” mode. The phone they are controlling is the software they previously started on their PC. Good news is that all control happens in the VDI session – they don’t need to switch back and forth between the VDI session and the local PC.
With that said, customers will still need to provide a VPN or SBC for remote connectivity of the softphone running on the local PC. An SBC is a great solution for customers that can support SIP integrations. The SBC will also allow end users to connect securely from “bring your own device” systems as it only allows SIP and RTP traffic required by the endpoints over a secure TLS connection.
For customers use h.323, don’t have, or can’t use an SBC, a VPN is generally required. The VPN solution must allow the end user computer to route traffic to the local PBX, media gateway, and other IP endpoints. Also, the VPN can’t do NAT translations, or the voice traffic will have one-way audio. Lastly, VPN connections may limit the ability for end users to use their own computers as company may enforce security policies that “BYOD” computers don’t meet.
There are VDI clients available for both information workers and call center staff. Use the client that best meets your needs. See the diagrams below for examples of the network connectivity needed.
Thanks for attending IAUG in Phoenix! I hope you enjoyed my sessions. It is always a blast getting to present to other “Avayans” and share information on technology. Enjoy the presentations and ping me with questions and comments!